Connect Your AI Assistant
This page explains how to add OmicsBox to your AI assistant, sign in, and manage the connection afterwards. For an introduction to what the connection does, see OmicsBox for AI Agents.
Before you start
- Sign in to OmicsBox Web or to the desktop application at least once. The connection uses the cloud identity created on your first sign-in.
- Make sure you have an active OmicsBox subscription if you want to run analyses.
Every assistant uses the same server address:
https://mcp.biobam.com/engine
You do not need to copy any key or password. When you add the address, the assistant opens an OmicsBox sign-in page and you approve the connection there.
| Assistant | Where to add OmicsBox |
|---|---|
| Claude (web and desktop app) | Customize > Connectors > Add > Add custom connector |
| ChatGPT | Turn on Developer mode, then Plugins > + |
| Claude Code | claude mcp add command in the terminal |
| Codex | MCP settings, followed by an explicit login |
| Cursor, VS Code, Windsurf | MCP server settings of the editor |
Add OmicsBox to your assistant
Claude
In the Claude web or desktop app:
- Open Settings > Customize > Connectors, select Add, and choose Add custom connector (Figure 1).
- Enter a name, for example
OmicsBox, and the server addresshttps://mcp.biobam.com/engine. - Select Continue, and then Connect on the new OmicsBox connector. A browser page opens where you sign in with your OmicsBox account and approve the connection (see Sign in and approve the connection).
When the connection expires or is revoked, Claude asks you to reconnect, either with a prompt or with a Connect card inside the conversation.
On Claude Team and Enterprise plans, an owner of the organization adds the custom connector first. Each member then connects with their own OmicsBox account.
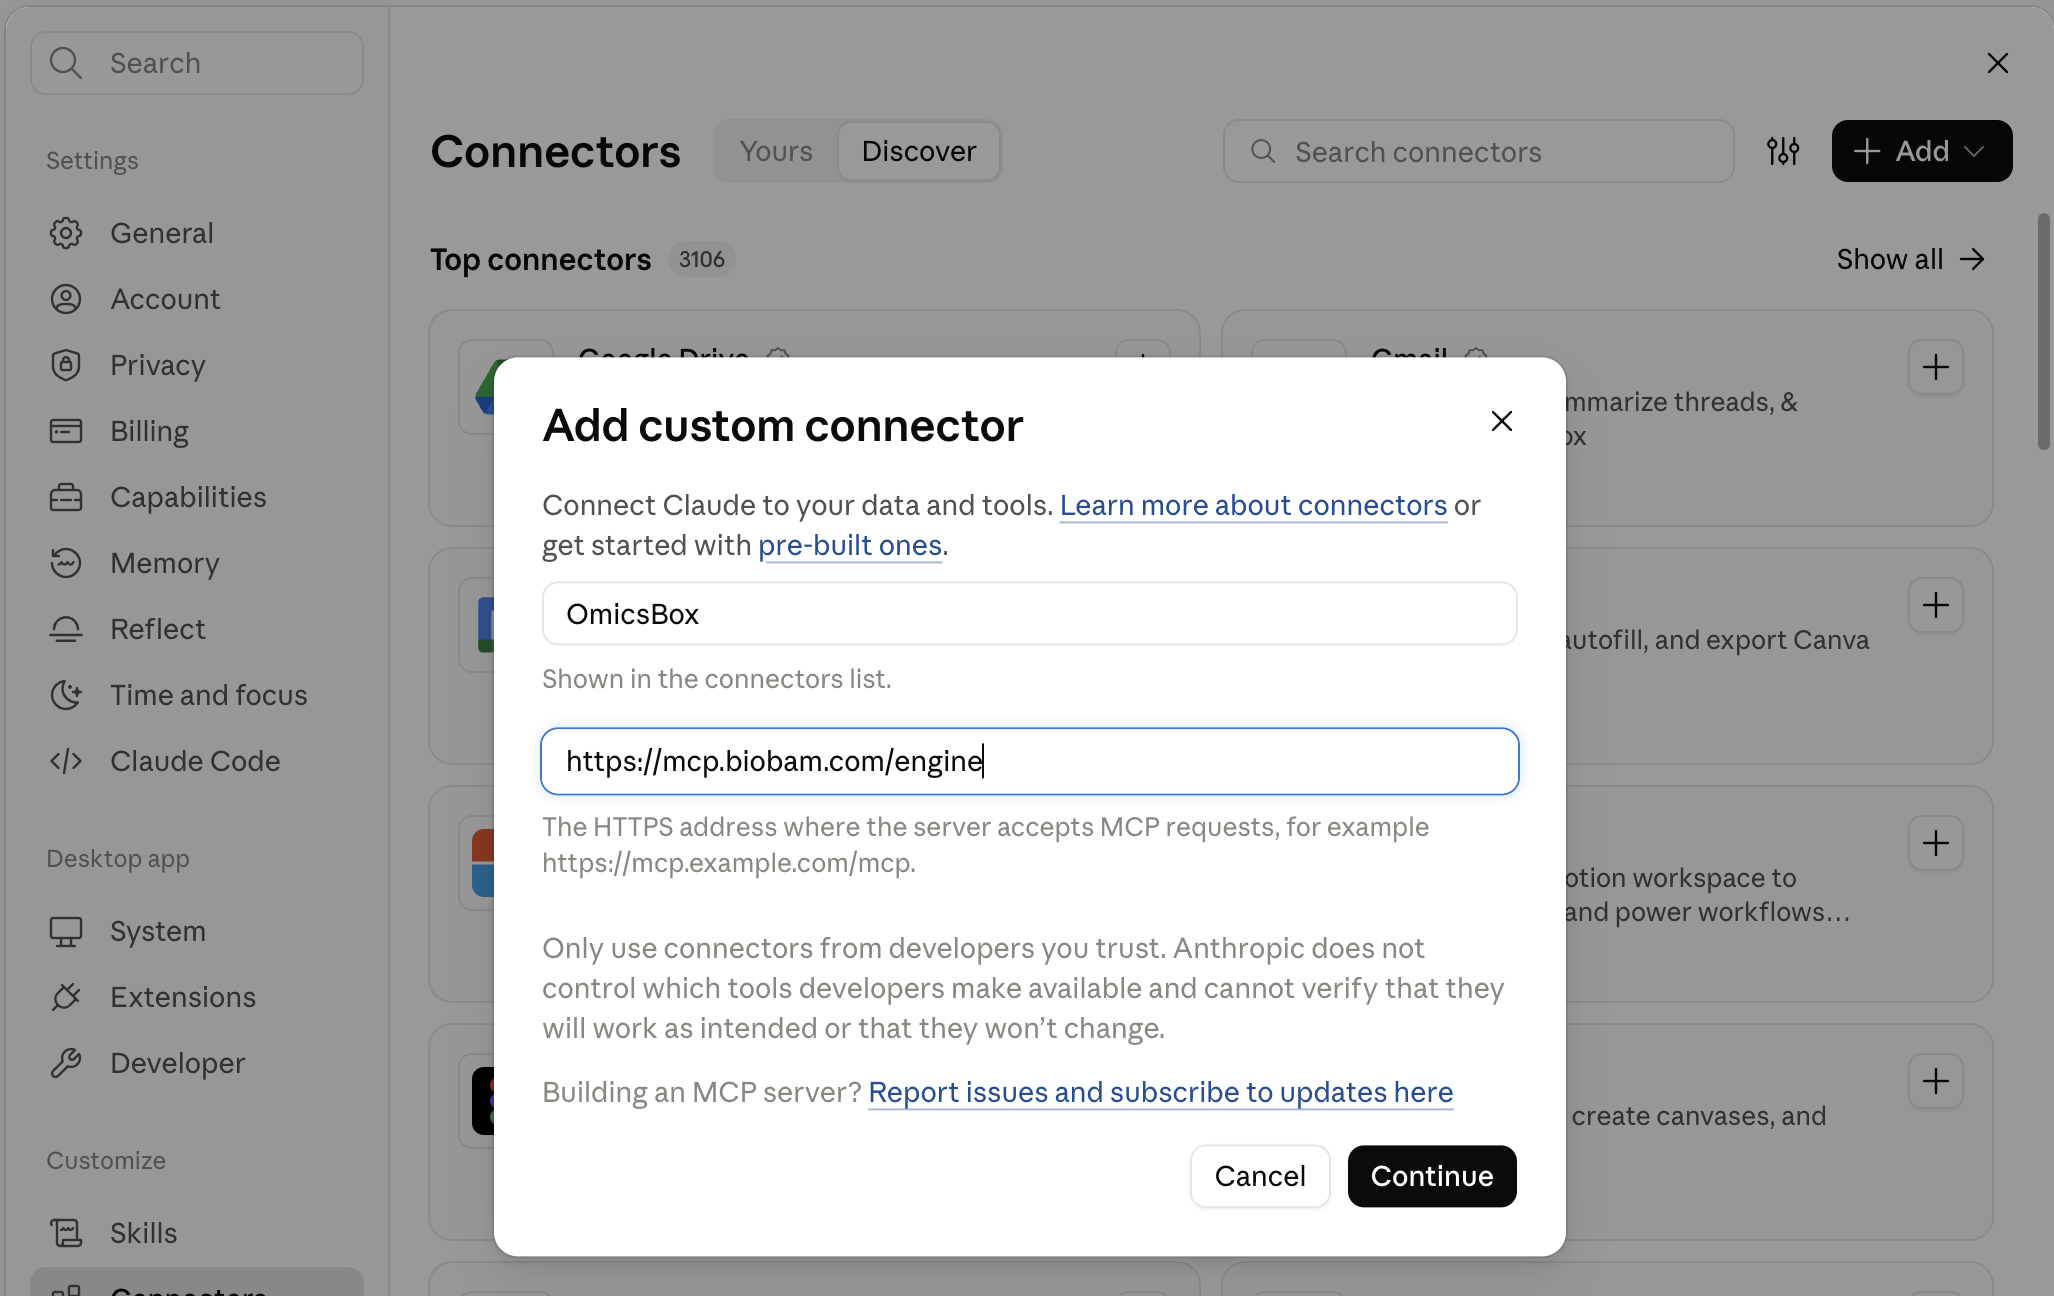
Figure 1. Adding OmicsBox as a custom connector in the Claude desktop app.
In Claude Science, open Connectors and add a Remote connector with the same name and server address, then select Add (Figure 2).
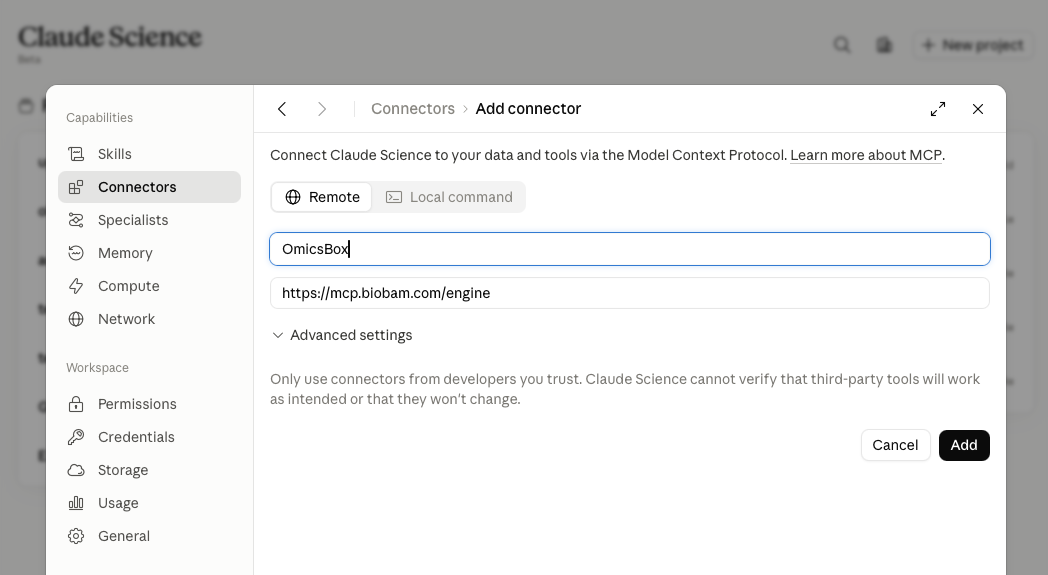
Figure 2. Adding OmicsBox as a remote connector in Claude Science.
ChatGPT
In ChatGPT on the web, OmicsBox is added as a custom app in developer mode:
- Open Settings > Security and login and turn on Developer mode.
- Go to Plugins and select the + button.
- Enter a name, for example
OmicsBox, and a short description. Under Connection, enter the server addresshttps://mcp.biobam.com/engineexactly as shown. - Create the connection and review the OmicsBox tools that ChatGPT lists.
ChatGPT does not use a developer mode app on its own. In each new conversation, open the + menu of the message box, choose Developer mode, and select OmicsBox. You can also name the app in your request, for example "Use OmicsBox to run InterProScan on proteins.fasta". The OmicsBox sign-in page opens the first time ChatGPT uses one of its tools.
ChatGPT asks for confirmation before each action that changes something, such as starting a job. You can approve an action for the rest of the conversation. New conversations ask again.
Developer mode is available on the Plus, Pro, Business, Enterprise, and Education plans. In Business, Enterprise, and Education workspaces, an administrator may need to allow custom apps first. ChatGPT changes these menus from time to time. If the steps above do not match what you see, check the ChatGPT help pages on developer mode.
Claude Code
Run the following command in a terminal:
claude mcp add --transport http omicsbox https://mcp.biobam.com/engine
The next time Claude Code uses OmicsBox, a browser window opens so you can sign in and approve the connection. You can also start the sign-in with the /mcp command. Each computer signs in separately, and each one appears as its own entry in Connected apps.
The first request of a session can take up to about 30 seconds while the OmicsBox tools start. Claude Code is the only client that lets you increase its waiting time. To avoid timeouts, set "timeout": 900000 (milliseconds) for the omicsbox server in your .mcp.json file.
Codex
Add the server address in the MCP settings of Codex, then log in explicitly from those settings. Codex does not start the sign-in on its own when OmicsBox asks for it, and it keeps the connection state of a task that is already running. After you log in, restart Codex or open a new task.
Cursor, VS Code, and other editors
Add a remote MCP server with the address https://mcp.biobam.com/engine and no extra headers. The editor registers itself and asks you to sign in the first time it uses OmicsBox.
Other assistants
Any assistant that supports remote MCP servers can use the same address. For an assistant that only supports local MCP servers, the open-source mcp-remote bridge can connect it to OmicsBox. Add an entry like this to the MCP configuration of the assistant:
{
  "mcpServers": {
    "omicsbox": {
      "command": "npx",
      "args": ["-y", "mcp-remote", "https://mcp.biobam.com/engine", "--transport", "http-only"]
    }
  }
}
The bridge requires Node.js and opens the OmicsBox sign-in page itself.
Sign in and approve the connection
When you connect an assistant, OmicsBox opens an approval page titled Connect app to OmicsBox, where app is the address of the assistant that asks for access. Sign in with your OmicsBox account if you are not signed in already.
The page lists what the assistant will be able to do:
- Browse tools and check run status: see the OmicsBox tool catalogue, and the state and logs of the runs it starts.
- Start and cancel analyses: submit tools to OmicsCloud and cancel them.
- Download results: fetch the result files produced by the runs it started.
Under Runs will be billed to, choose the subscription that pays for the analyses the assistant starts. The Cloud Units used by these analyses come out of this subscription. If your account has no active subscription, you can still connect and choose a subscription later from Settings.
Select Allow access to finish (Figure 3). The browser returns you to the assistant, and OmicsBox is ready to use.
Assistants that run on your computer
For assistants that run locally, such as Claude Code, the approval page shows a warning that the app will receive the authorization on a local port. Only continue if you started the connection yourself from an application you installed.
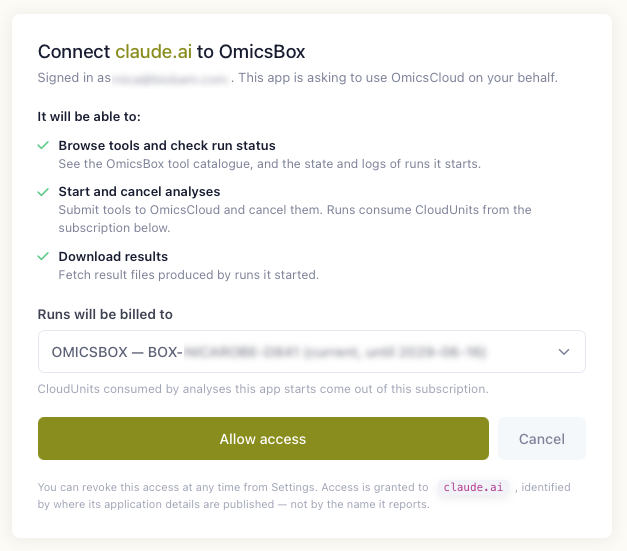
Figure 3. The OmicsBox approval page for a connection from Claude.
Manage and disconnect assistants
In OmicsBox Web, open Settings > Connected apps to see every assistant connected to your account. The table shows the app, the access it has, the subscription it is billed to, when it was connected, and when it was last used. Apps that registered themselves with their own name are marked as self-declared.
Select Disconnect to remove an assistant. The change takes effect immediately and applies only to that row. Desktop assistants sign in per computer, so the same assistant can appear more than once.
A connection stays signed in for 7 days and renews itself automatically while you use it. If you do not use it for a long period, the assistant asks you to sign in again.
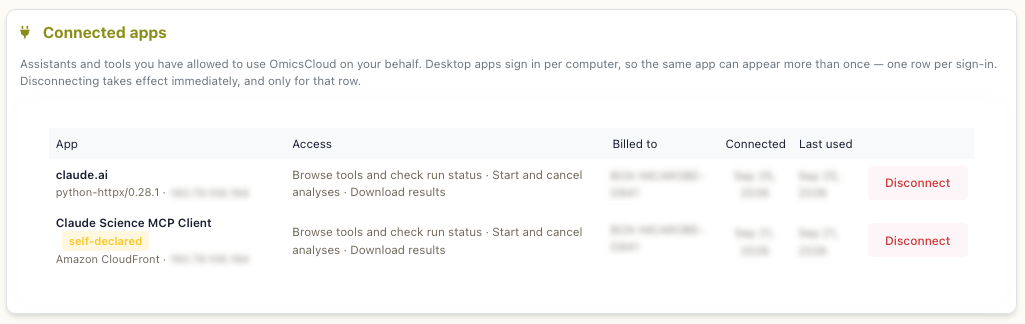
Figure 4. Connected apps in the OmicsBox Web settings, with one row per sign-in.
Alternative: connect with an Engine API key
Some assistants cannot open a sign-in page, for example on a shared server or in an automated setup. In those cases, you can connect with a personal Engine API key instead:
- In OmicsBox Web, open Settings > Engine API Keys.
- Enter a key name, choose an expiry between 30 days and 1 year, and create the key. Copy it straight away. This is the only time the full key is shown.
-
Configure the assistant to send the key in an
Authorizationheader. For Claude Code:claude mcp add --transport http omicsbox https://mcp.biobam.com/engine \ --header "Authorization: Bearer <your-api-key>"
Each key is linked to the subscription that was active when you created it. The Engine API Keys section is available when your subscription includes the OmicsBox Engine.
Engine API keys and connected apps are managed separately. Revoking a key does not disconnect any app, and disconnecting an app does not revoke any key.
Keep your API key private
Anyone who has the key can run analyses billed to your subscription. Do not share it or save it in shared files, and revoke it from Settings > Engine API Keys if it may have been exposed.